March 19, 2015
Kimono Suits the Mature Man: Part 18 – Wearing Hakama
Part 18: Wearing Hakama
Illustrator Kazuo Hozumi explains the "basics" of men's kimono attire.
Part 12 covered footwear like geta and setta. While it's fine to pretend to be Ryoma Sakamoto, wouldn't traditional Japanese footwear suit a kimono better?
Text and illustrations by Kazuo Hozumi
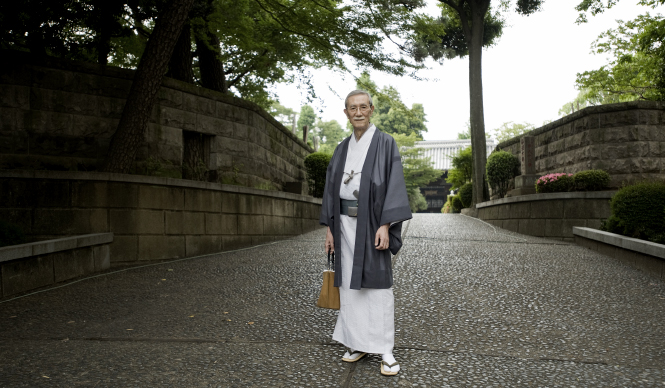
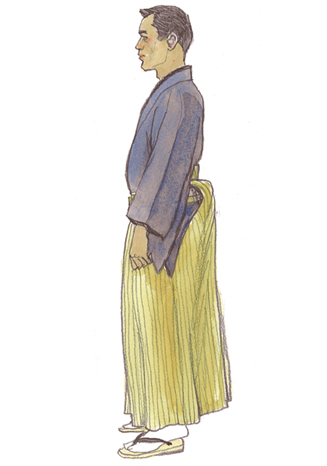
As men's formal wear is generally known as "haori-hakama," wearing hakama is considered standard. Even in non-formal situations, wearing hakama lends a man's kimono a dignified air, making him appear sharp and stylish.
Modern hakama evolved from the "han-bakama" worn as the lower garment of kamishimo, which served as a semi-formal attire for samurai in the Edo period. It was a simplified version of the long hakama worn in scenes like the Matsu no Rōka in Chushingura. However, only samurai wore hakama; as mentioned previously, commoners could only wear them if they were permitted to use surnames and carry swords. It wasn't until the Meiji era, when these restrictions were eased, that hakama became widely adopted.
For the wearer, donning hakama sharpens the mind and naturally improves posture. Once accustomed to the casual "kirinashi" style, one should definitely try wearing hakama to experience its benefits and stylishness. Beyond appearance, a significant advantage of hakama is that it allows one to be less concerned about minor disarray in the kimono.
First, tie the obi
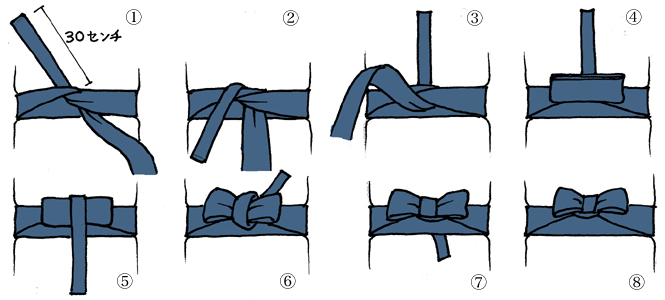
When wearing hakama, it's advisable to adjust how you tie the obi underneath. While a standard "kai-no-kuchi" knot is acceptable, the "ichimonji" knot is commonly used when wearing hakama. Hakama have a stiff back piece called a "koshiita," and this knot helps create a stylish bulge below it. The knot should be centered at the back seam, not shifted to the side. Women's hakama, often worn at university graduations, are typically skirt-like and lack a koshiita. The koshiita appears to have emerged in men's hakama in the early modern period. An illustration of the ichimonji obi knot is provided for reference.
Put on the hakama
Once the obi is tied, it's time to put on the hakama. A useful tip here is to tuck the hem of the kimono into the obi. You can do this with the front hem or by lifting the back hem slightly. This hidden tuck prevents the kimono from showing below the hakama, allows for easier movement, and ensures the kimono hem doesn't peek out. It also makes it possible to effectively wear kimonos that are slightly too short.
With preparations complete, you can now put on the hakama. There are two main types: the divided "machi-tsuki hakama" or "uma-nori hakama," similar to trousers, and the undivided "ando hakama," which resembles a skirt. For formal wear, plain machi-tsuki hakama are considered traditional (machi-tsuki hakama have a lower gusset than uma-nori hakama). Ando hakama are considered less formal, but the wearing method is the same. Tying the hakama cords can be quite cumbersome. Please refer to the illustrations.
Tie the cords
1.First, as mentioned earlier, tuck the hem of the kimono into the obi.
2.Place the front cords of the hakama against the front of the obi and step into them. Ideally, the front cords should be positioned so that about 1 to 2 cm of the obi is visible. This is the "groom style" of wearing; there is also a "samurai style" where the obi is not shown. In either case, the length of the hakama front hem should be just right, grazing the instep of the tabi.
3.Bring the left and right front cords around to the back, tie them securely once over the obi knot, and bring them back to the front.
4.Cross the left and right cords in front.
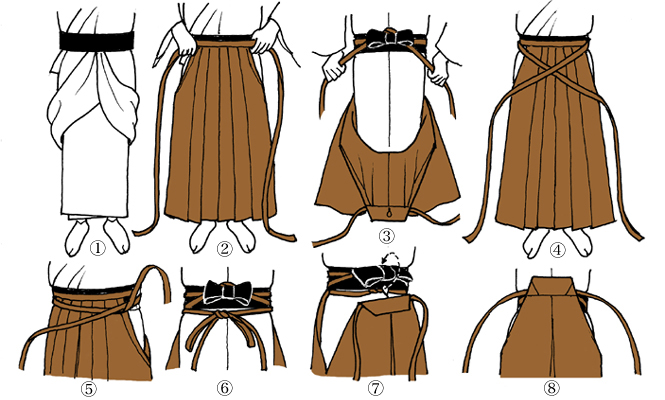
5.Fold one cord in half at the side and bring it to the back.
6.Tie the left and right cords together at the back, below the obi, and tuck in any excess.
7.Next, lift the back of the hakama. The koshiita has a small "hera" (stiffener) attached, which should be inserted from above between the kimono and the obi to secure the koshiita over the obi knot. This ensures the koshiita sits snugly in the center of your back.
8.Bring the left and right back cords, from the sides of the koshiita, forward.
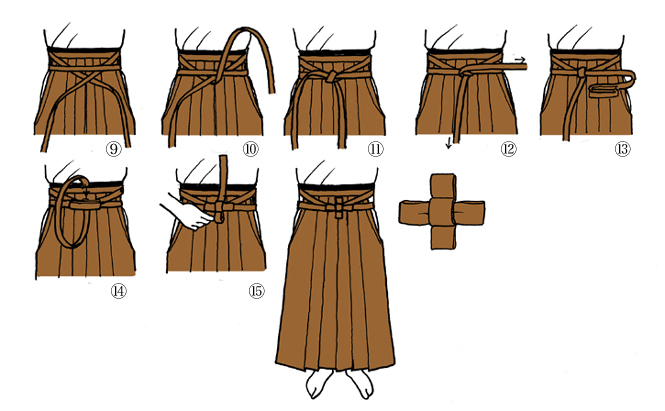
9.Pass them under the front cords you just wrapped and cross them in front.
10.Pull the cord in your left hand upwards.
11.Pass this cord down through the back of the front cords.
12.Take the cord in your right hand, fold it to the left, and switch hands.
13.Wrap the cord now in your right hand around the front cords from top to bottom again. Coil the other cord and place it on top of the knot. The folded length should be about three times the width of the cord (around 7 cm).
14.Thread the hanging cord back and forth several times, leaving about 20 cm, and then address the vertical closure.
15.Insert your finger to create a loop, adjust the length, and pass it under the front cords, pulling it up. Create a similar loop at the top and tuck the excess inside. This forms a "cross" knot. Folding to about three times the cord's width creates a shape similar to the Red Cross symbol. It often looks better if the horizontal part is slightly longer than exactly three times the width.
In addition to this cross knot, there is also a single horizontal knot method. This omits the upper and lower knots and ties horizontally on the sides, giving a slightly more casual feel.
How to fold hakama
Wearing hakama is one thing, but folding them can be a bit tricky. Because hakama have pleats, folding them carelessly can result in unsightly wrinkles. However, it's not a major issue once you learn. This, too, is a reflection of traditional Japanese aesthetics and practical wisdom.
First, lay the hakama flat, inside down, on a level surface.
Smooth the back pleats, then turn it over and smooth the front pleats.
A bamboo ruler can be helpful for turning it over (Diagram A).
After smoothing the front pleats, fold up about one-third of the hem.
Then, fold down the side with the koshiita. In other words, fold it into thirds.
Be careful not to let the koshiita protrude.
Finally, tie the left and right cords to secure it. Please refer to the diagrams for this step.
The cords are quite long, so folding them into four as shown in Diagram B makes them easier to handle.
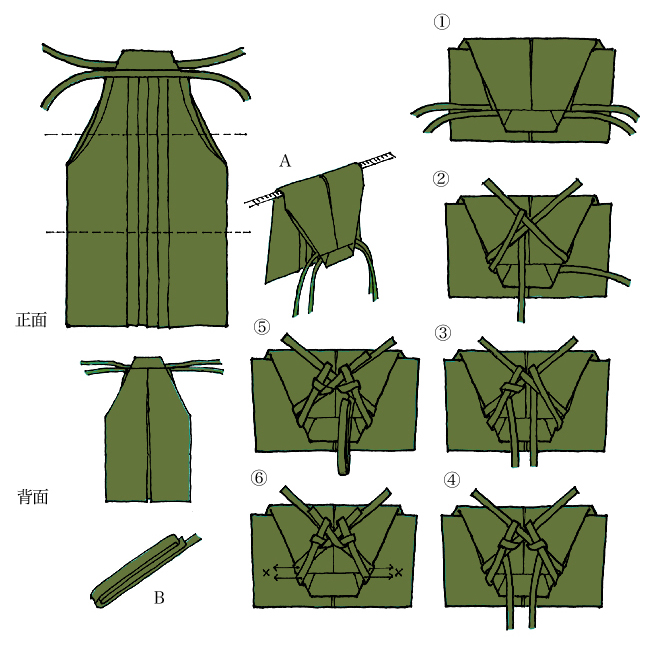
You might wonder why the hakama cords need such a complicated fastening. The reason is twofold: to fold the hakama neatly without wrinkles, and to ensure that when you wear them next time, they can be easily untied by simply pulling the crossed part of the cords. Ingenious!