
Part 5: How to Tie the Kaku Obi (1)
Illustrator Kazuo Hozumi explains the "absolute basics" of dressing in men's kimono.
The fifth installment covers how to tie the kaku obi (square sash). This time, in the first part, we'll learn the common "kai-no-kuchi" knot.
Text and illustrations by Kazuo Hozumi
Kimono Style: It All Comes Down to the Obi
I went to see the fireworks over the Sumida River. The Ginza subway line was packed with young women in yukata, and many of their boyfriends were also wearing yukata. However, their yukata styling seemed off. As I mentioned last time, many had the obi tied around their waist, creating a flared skirt effect.
When I first wore a kimono, I managed to put it on without much thought. But I realized then that people unfamiliar with kimonos truly don't understand these details.
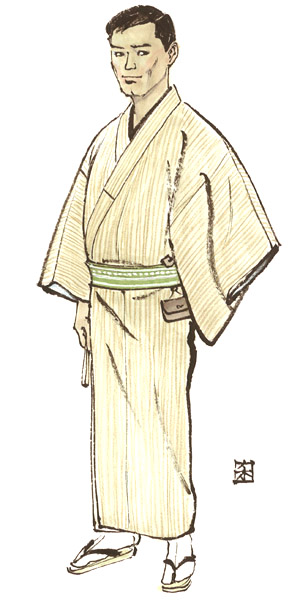
About 90% of kimono styling is determined by the obi knot. So, this time, I'll write about how to tie the kaku obi.
While there are slight variations, kaku obi have a standard length. The ones I own are about 3.8 to 4.1 meters long (and about 10 cm wide; anything wider looks clumsy).
You wrap this around your waist and tie it. Whether you're thin or heavy, to tie it properly, you must fold in the excess length to fit your own waist size.
If you don't know this and use the entire length, the ends will be left over and impossible to manage. Some people wrap it around excessively, creating a bulky mess, and others even try to force a bow tie. Kaku obi are woven tightly, so a bow tie is quite difficult.
When wearing a kimono, to prevent it from losing its shape, you first tie it with the under-sash (shita-himo). However, with practice, you can wear it without the under-sash, or you can even remove it after tying the obi.
Normally, the obi is tied over the under-sash and hidden. The visible part is tucked under the obi so it's not seen.
As I wrote in the second-to-last installment, the principle is to tie the obi at the hip bones. But I saw someone who had tied the under-sash at the waist and the kaku obi at the hips. I was taken aback by the two-tiered arrangement of a thin cord above and a kaku obi below.

With the kaku obi, first fold one end in half. This is called the 'te' (hand).
Leave about 40 centimeters of the 'te' end sticking out (1), and wrap the obi around your stomach three times.
The end opposite the 'te' becomes the 'tare' (dangling end). Fold the 'tare' to a length that will be just right when tied (2), and tie it with the 'te' end.
Tie a firm knot here to prevent wrinkles (3).
How much to fold depends entirely on experience. Adjust it to your own size. You can also mark the folding point (the loop) with basting stitches.
Next, fold up the 'te' end (4), lay the 'tare' end over it, pass it under the 'te' end from bottom to top, and tie it securely (5).
Be careful to ensure the knot looks balanced. If the 'te' and 'tare' ends are too long, the knot will look sloppy; if they're too short, it will come undone easily. Like anything, it takes practice.