Part 6: How to Tie the Kaku-obi Sash (2)
Illustrator Kazuo Hozumi explains the "basics" of dressing in a man's kimono.
This is the sixth installment, continuing our discussion on obi sashes. Today, we learn a few subtle tips for after it's tied.
Text and illustrations by Kazuo Hozumi

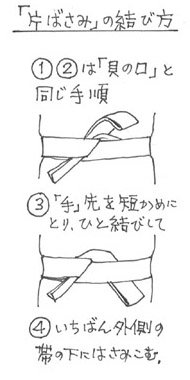
The knot from last time was the most common, called 'Kai-no-kuchi' (clam's mouth). Another type is 'Kata-hasami' (one-sided clamp). It's said that ronin (masterless samurai) used this knot when wearing a 'kinagashi' style kimono, and it's also known as the 'Ronin knot.' It's familiar from films like those featuring Shintaro Katsu's Nemuri Kyoshiro.
This is a slightly simplified version of the Kai-no-kuchi, but rather than a knot, the clamped section is flat and surprisingly difficult to undo.
When I first learned to tie the 'Kai-no-kuchi' knot by following the diagrams, I've continued to tie it in front and then rotate it to the back. Once you get used to it, you can apparently tie it directly behind you. As I've mentioned before, the principle is to rotate the obi clockwise. Turning it the opposite way will cause the kimono to become disheveled.
There are also other knots like the Kanda knot or the knot used when wearing hakama, but we'll explain those as they come up.
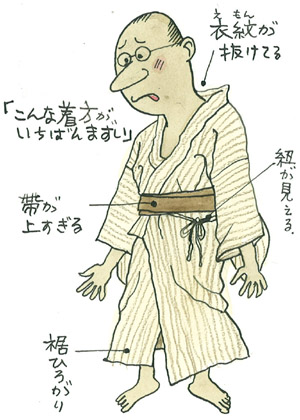
Like a necktie, an obi sash feels good when tied well. An obi tends to sit better on someone with a slightly rounded stomach. As I am quite thin, I usually tuck two or three folded hand towels inside my kimono to create a more rounded shape after tying the obi.
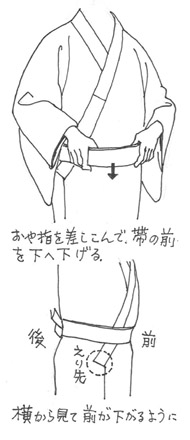
One more thing: when viewed from the side, be mindful that the obi should slope slightly downward towards the front. This is a key to making your kimono-clad appearance look sharp. Sometimes, I insert my thumb into the front of the obi and pull it down slightly to shape it. When standing up after sitting for a long time, the obi tends to ride up, so I always perform this adjustment.
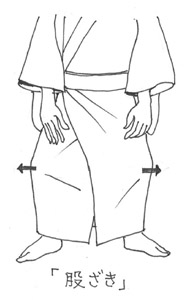
Now that the kimono is on, your legs are confined, making it difficult to walk. After dressing, let's perform a step called 'matagaki.' Bend your knees, lower your hips, and step your feet out to the sides. This allows your legs to move freely and eliminates the worry of the kimono becoming disheveled.
Coordinating the obi with the kimono's colors and patterns is also important. It's an opportunity to showcase the wearer's taste and sense. It's worth having several obi sashes. Reversible ones with different patterns on each side are particularly convenient.
Hakata-kenjo obi are quite common, and most people who wear kimonos likely own at least one. It's important to know that these also have an upper and lower side to the pattern; the more intricate side is the top.
The primary material is silk. Tsuzure-ori (tapestry weave) silk is said to offer an exceptional wearing comfort but is expensive. Depending on the season, coarser fibers or cotton are also used. Synthetic fibers are cheaper but are said to be less comfortable to wear.
The firmness or softness of the obi fabric is also a matter of personal preference, so it's important to find one that suits you.