January 14, 2015
Series: Michiko Fujiwara, December 2013 | Relax and Train Your Facial Muscles for a Youthful Look!
December 2013 | Face Muscle Massage & Exercise: A Practical Guide
Relax and Tone Your Facial Muscles for a Refreshed, Youthful Appearance!
Lately, I’ve been really into “face muscle massage” and “face exercises.” While these have been trending for several years, my personal enthusiasm has just arrived. So, I hope this will be particularly helpful for those who have never tried either! Here’s a practical guide.
Photographs & Text by FUJIWARA Michiko
Relax and Train Tense Facial Muscles for a Youthful Look
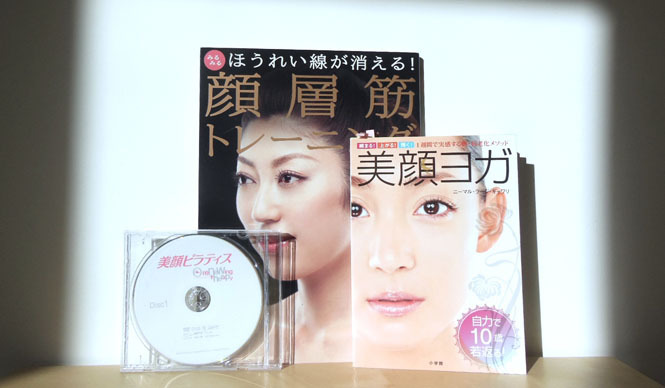
It all started withmy interview with Masashi Nakatsuji in October. Among the products I received was a DVD on face muscle massage. I had actually been seeing Nakatsuji for about two years for face muscle massages, but I always found them so relaxing that I’d fall asleep, and I never learned how to do it myself.
However, watching the DVD I received showed me how to perform the massage on myself. I immediately followed along with the model’s movements, and by the end, my facial muscles felt loosened, and my face felt fuller and more radiant! I remembered, “Yes, this is how my skin felt after Nakatsuji’s treatments (though much more so, of course),” and decided to try it myself.
Nakatsuji’s face muscle massage is called “Facial Muscle Layer Training,” a method designed to relax and train tense facial muscles for a more youthful appearance. Unlike typical massages that involve stroking, this technique involves holding a finger in place and massaging vertically along the muscle fibers, moving left-right or up-down. Depending on the area being massaged, you use either two or four fingers, adjusting based on the size of the area. I learned from the DVD, but it’s also clearly explained with photos in Nakatsuji Masashi’s book, ‘Facial Muscle Layer Training’ (Takarajimasha), which I highly recommend.
Let me briefly introduce the method (with some personal adjustments)
① First, relax the neck muscles. Place four fingers (excluding the thumb) together at the base of your neck and massage diagonally up and down five times with a gentle squeeze. Then, move your fingers slightly lower and repeat, massaging about four spots down to the collarbone.
② Insert your thumbs under your jaw and massage diagonally up and down five times in three different spots.
③ Place your index and middle fingers on your chin and move horizontally five times.
④ Using your index and middle fingers, make small circles around your mouth in about five locations. Also, circle around your upper and lower lips with your index finger in five spots.
⑤ Place three fingers below your cheekbones, where you can feel a slight movement when you chew, and massage back and forth five times. Continue this down to the jawline in three spots.
⑥ Place your index and middle fingers along your nasolabial folds and massage diagonally up and down five times. Then, massage the area above and below the corners of your mouth five times each.
⑦ For the bridge of your nose, use both thumbs to press diagonally upward, scooping along the nose from the nostrils to the brow.
⑧ Around the eyes, use your middle fingers to make small circles. Do this five times per spot, massaging five areas around the upper and lower eyelids. Continue with small circles slightly lower down.
⑨ Place three fingers above your eyebrows and move up and down in about three locations.
⑩ Use three fingers to massage your entire forehead and hairline from side to side with a gentle squeeze.
⑪ Make small circles at your temples.
⑫ Drape your five fingers over your ears and make large circles.
⑬ Finally, massage your entire head in a zigzag motion from side to side. When massaging the back of your head, tilt your head back slightly to apply the right amount of pressure. Massaging the area just above the base of your neck on the sides is particularly invigorating, so definitely give it a try! — And that’s how it’s done.
“Just Do It” During Your Morning and Evening Baths
When massaging your face, be gentle and avoid applying too much pressure. The key is to use the rounded part of your fingertips (slightly angled) and to relax your grip, as this makes it easier to target the muscle fibers. For the head, neck, and around the ears, using the pads of your fingers allows for just the right amount of pressure. This routine takes about five to six minutes, but if you focus more on tense areas, it will naturally take longer, so the duration varies per person.
I do this during my morning and evening baths. It’s convenient because I can do it “just because” while soaking in the tub, and the massage time perfectly complements my bath time. Plus, I do it with my fingers wet from the bathwater, which reduces friction on the skin and eliminates the need for massage cream. Many people find using massage cream to be a hassle and don’t do it daily.
After finishing the facial muscle layer massage, it’s time for a lift. First, tilt your face slightly forward. Form a right angle with your thumb and index finger, place them on the lower part of your cheeks next to your nose, and press upwards towards the base of your ears, lifting the facial muscles. Hold for five seconds at the side of your ears. Then, use all your fingertips to gently stroke down from your ears to the hollow of your collarbone, known as the “lymphatic waste bin.” This results in a more sculpted cheek. Remember to keep your fingers wet for better glide.
Finally, the lymphatic drainage using your entire palms. Lightly place your fingertips together and rest both hands around your jawline, then glide smoothly down to the hollow of your collarbone. Next, stroke from the tip of your chin, past the base of your ears, to your collarbone. Then, from the sides of your nose, past your ears, to your collarbone. Lastly, stroke from the center of your forehead, past your ears, to your collarbone. The trick is to use as little pressure as possible and move your palms slowly. Doing so will make your skin appear brighter and your face more refined when you’re finished!
Face Exercises That Require Making “Funny Faces” You Can’t Do in Public
Now, for my other recent obsession: “face exercises.” These include actions like sticking out your tongue as far as possible or moving only your eyeballs, and I’ve rediscovered how effective they are. My favorite is to open my mouth wide into an “ah” shape, curl my upper and lower lips over my teeth, and then use only my lower eyelid muscles to close my mouth. This targets sagging in the lower eyelids, giving your eyes a more vibrant appearance.
Another exercise involves moving your lower jaw forward and backward, then side to side while keeping it extended. I have a tendency towards TMJ issues, and initially, my left jaw hurt when I moved it to the left. However, by exercising gently without overexertion, the pain has lessened, and I can now move it much further. Instead of avoiding movement due to pain, it seems important to train it like rehabilitation.
There are also eye muscle exercises where you hold your eyeballs looking straight up, sideways, and down for five seconds each. The first time I tried this, I was amazed at how my eyes sparkled and my vision suddenly brightened. Perhaps one reason why adult eyes tend to lose their luster is the weakening of the eye muscles. Doing these exercises might help prevent that dullness in adult eyes... maybe!
The exercises I refer to are from the book “Facial Yoga” by Nimal Raj Gawali (Shogakukan). This book not only offers face exercise methods but also includes yoga poses to address various facial concerns, which I also recommend exploring.
I used to do these exercises after my facial muscle layer training in the bath, but it made my bath time too long and I’d get skin irritation. Now, I do them during short breaks. For example, while waiting at a red light when driving, when I’m a passenger, or even when I’m in the restroom. Since they often involve making “funny faces,” I can’t do them in public.
Since I started both relaxing muscle tension with facial muscle layer training and then actively training the muscles, my facial contours have become noticeably sharper and my appearance more youthful (according to myself). Therefore, my New Year’s resolution is set: “I will solidify this look!”
Thank you all for your support this year. Wishing you a wonderful New Year!